itsgr8
Member
- Joined
- Jan 15, 2026
- Threads
- 7
- Messages
- 43
- Reaction score
- 48
- Location
- SF Bay Area - Mid-Pen
- Car(s)
- 2025 Integra Type S
- Thread starter
- #1
I've been playing around detent springs for the past month and want to share my learning and experience with the community.
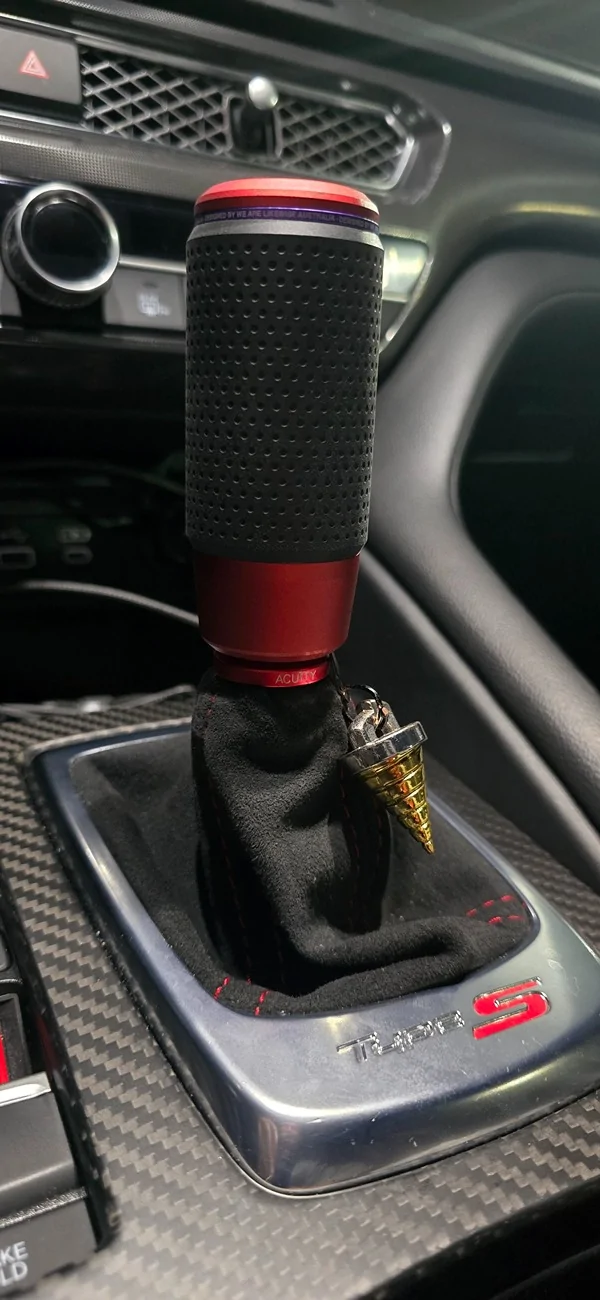
This is my shifting setup prior to the detent springs.
https://www.integraforums.com/forum...rod-chasing-js-boot-delete.59455/#post-953410
+ Acuity 4-way adjustable shifter
+ Acuity SHIFTER CABLE BUSHING
(below are just cosmetic upgrades)
+ Acuity Titanium upper shift rod
+ Chasing JS Titanium shift boot delete (stock boot won't fit at the knob height I wanted)
+ Acuity ESCO-Ti Shift Knob in Burnt Titanium Finish
+ Acuity Shift Boot Collar Upgrade (Burnt Titanium Finish)
Hybrid Racing Detent Springs
- Installation Effort: moderate (1-1.5 hrs).
- Plenty of installation videos for FL5/DE5 on Youbute
- Num of springs: 2
- My Personal Verdict: NOT recommended
- makes shifting too stiff, especially the side-to-side movement.
- I often miss-shifted to 6th when I intended to reverse.
- makes daily driving/shifting tiring
I ended up uninstall them and restore to factory detent springs after a week.
FK8TD Detent Springs
- Installation Effort: hard (3-3.5hrs).
- Need to jack up the car, and remove driver side transmission mount
- Num of Springs: 4 (I only installed 3, more on this later)
- My Personal Verdict: if you're willing to spend 3 hours to improve your shifting feel by 20%, OR you plan to upgrade your transmission mount, GIVE IT A TRY
- slightly improved the notchiness when shifting into gear, by about 20% (very "scientific" I know)
- slightly increased front-back shifting effort (1-2, 3-4, 5-6)
- no effect on side-to-side resistance
These seems to be the less well-know detent spring, and there's not a lot videos/reviews about them.
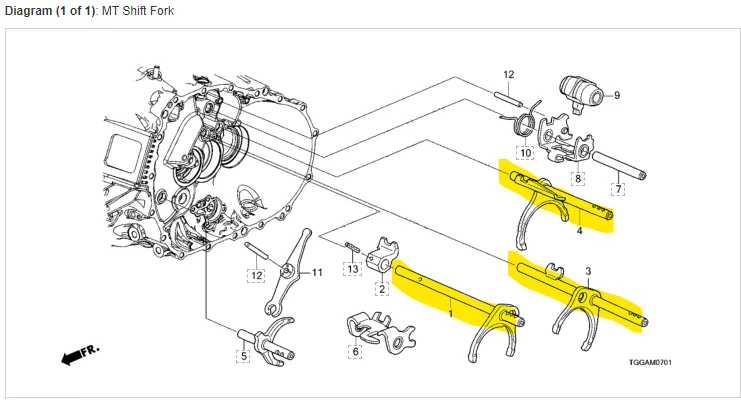
I came across these springs from a blog post. It's for FK8, but the theory of operation makes a lot sense to me: there are 3 shifting rods (1-2, 3-4, 5-6) so we need 3 detent springs, one for each rod. (see the diagram below from that blog post). FL5/DE5, well, also has 3 shifting rods, and I don't expect Honda to dramatically change how the shifting internals between FK8 and FL5.

Even though I was mentally prepared by the blog post, the installation was still way more involved than I expected. Essentially you need to completely remove the driver side transmission mount in order to access the 3 detent springs.
Some helpful videos:
-
-
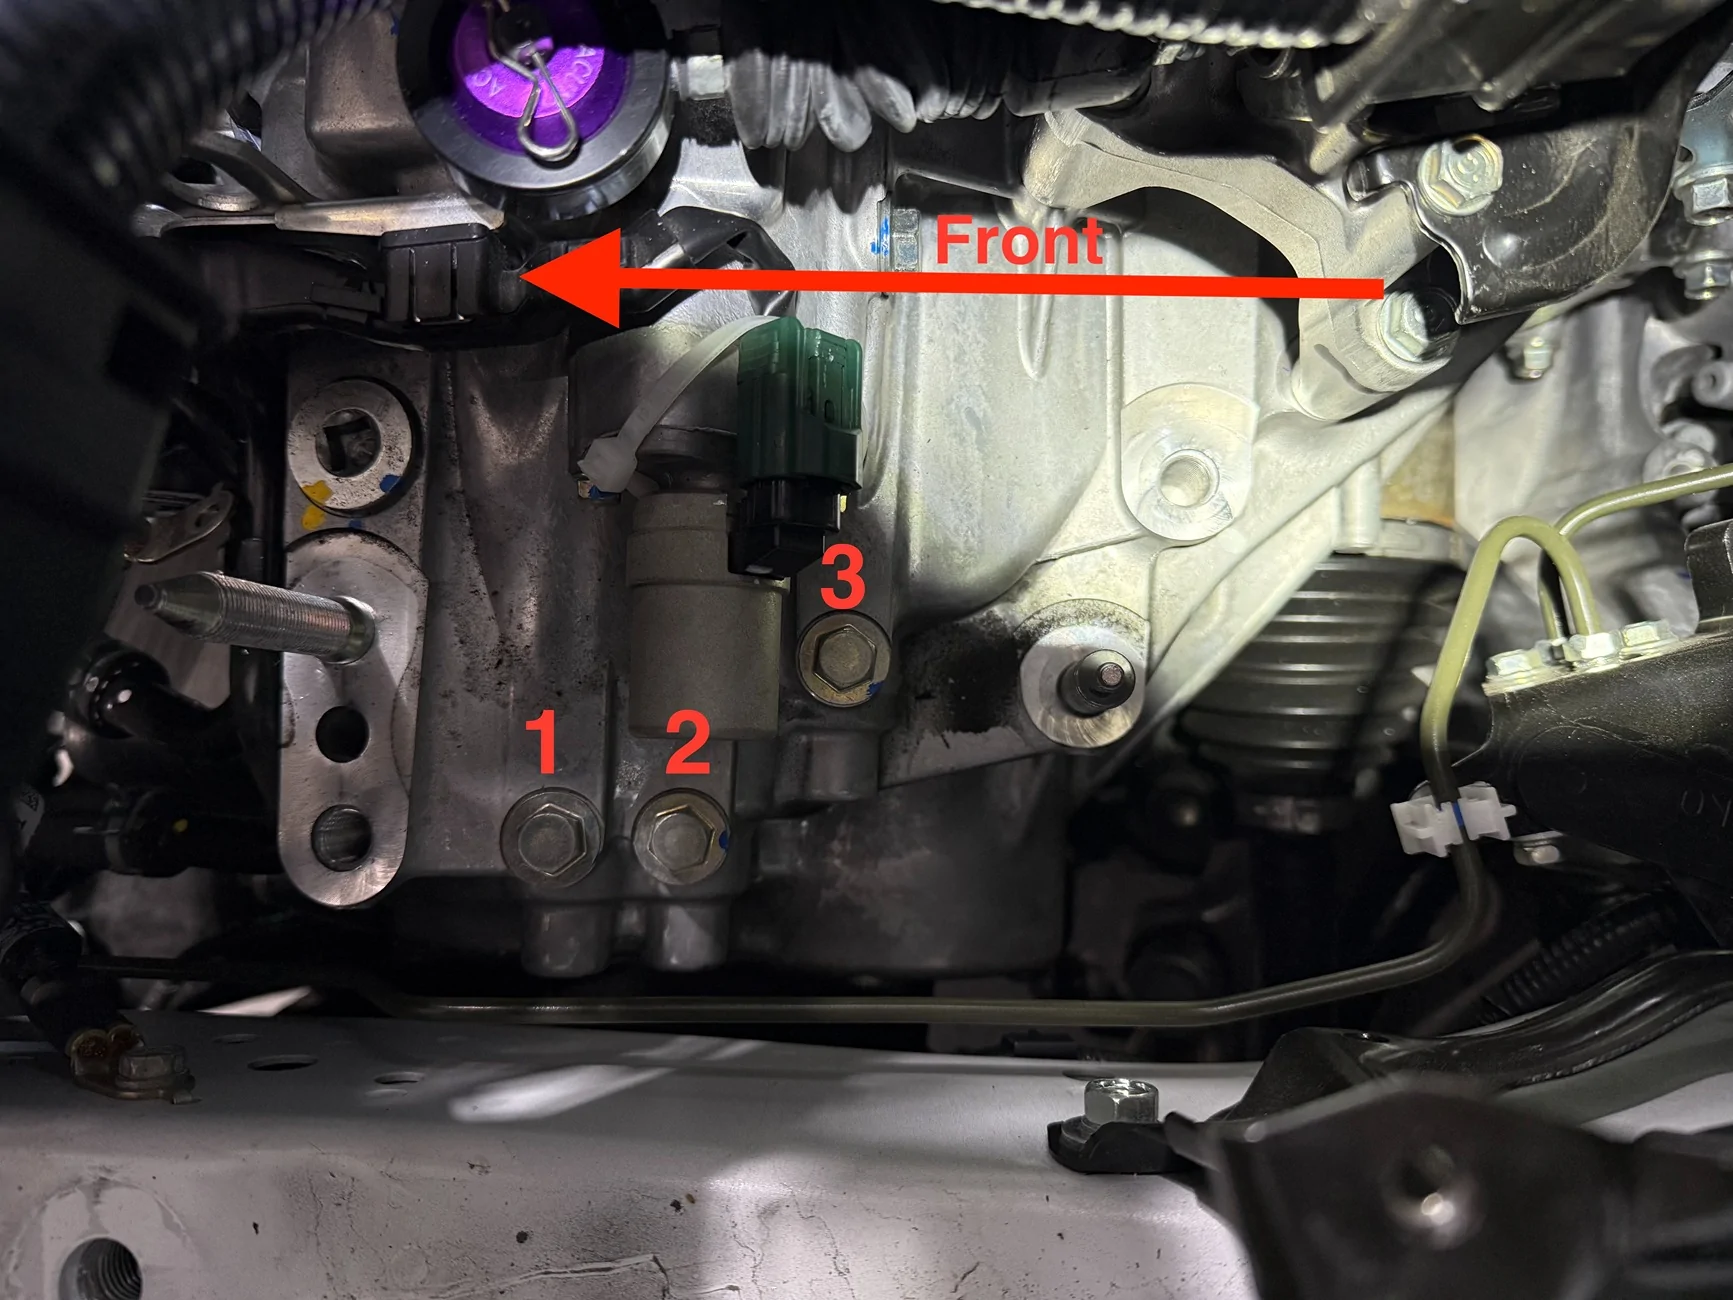
After removing the battery, battery tray and intake box, we need to uninstall the driver-side transmission mount. Here are some photos I took during the installation.
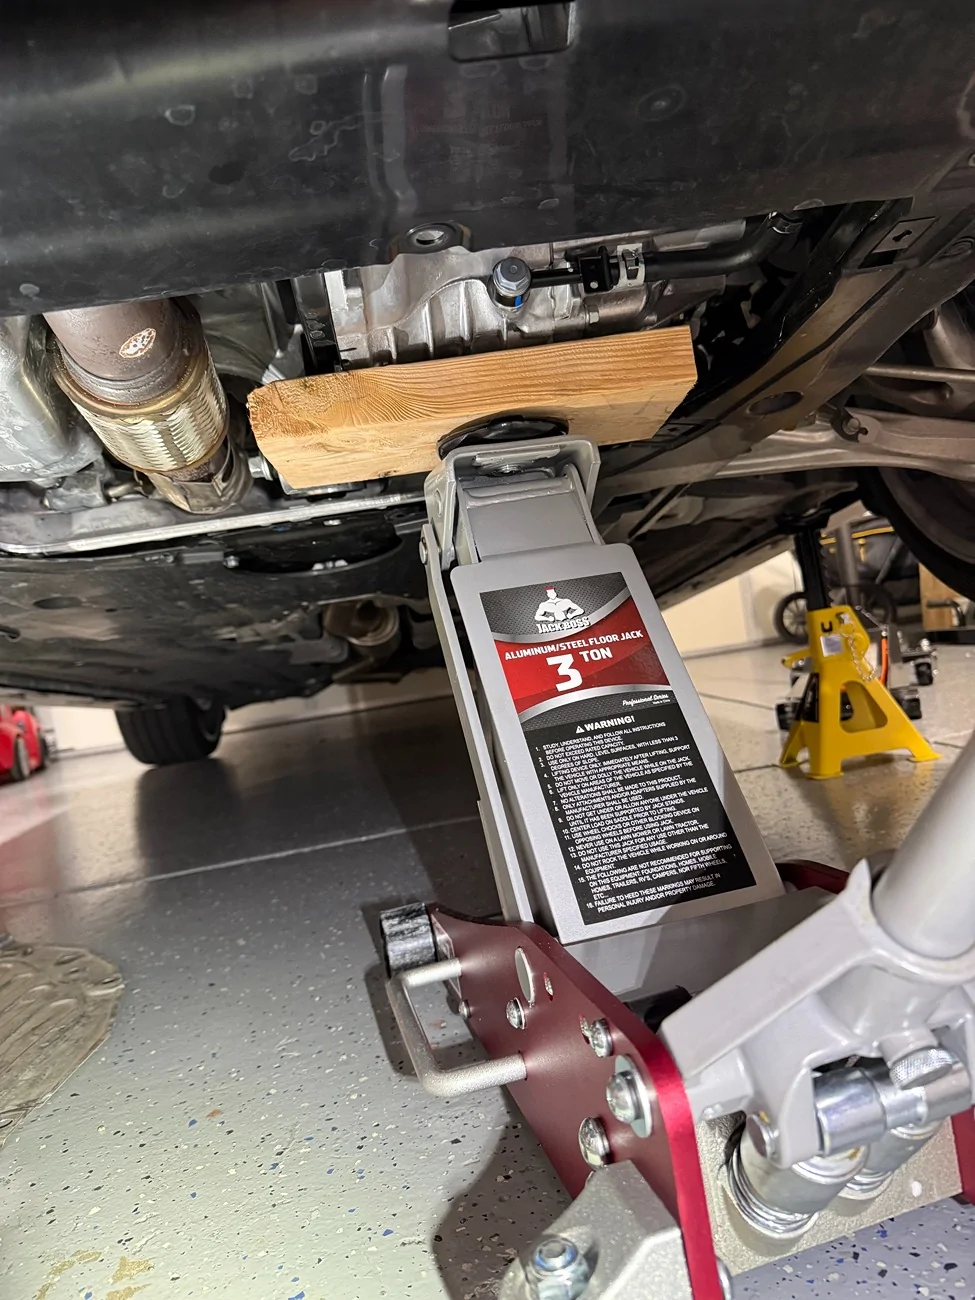
BEFORE remove these bolts, IT IS VERY IMPORTANT TO support the transmission from below, with a jack and wooden block. Jack it just tight enough until you feel slight resistance, don't apply too much pressure - we only want to support the transmission when we remove the mounting bolts.

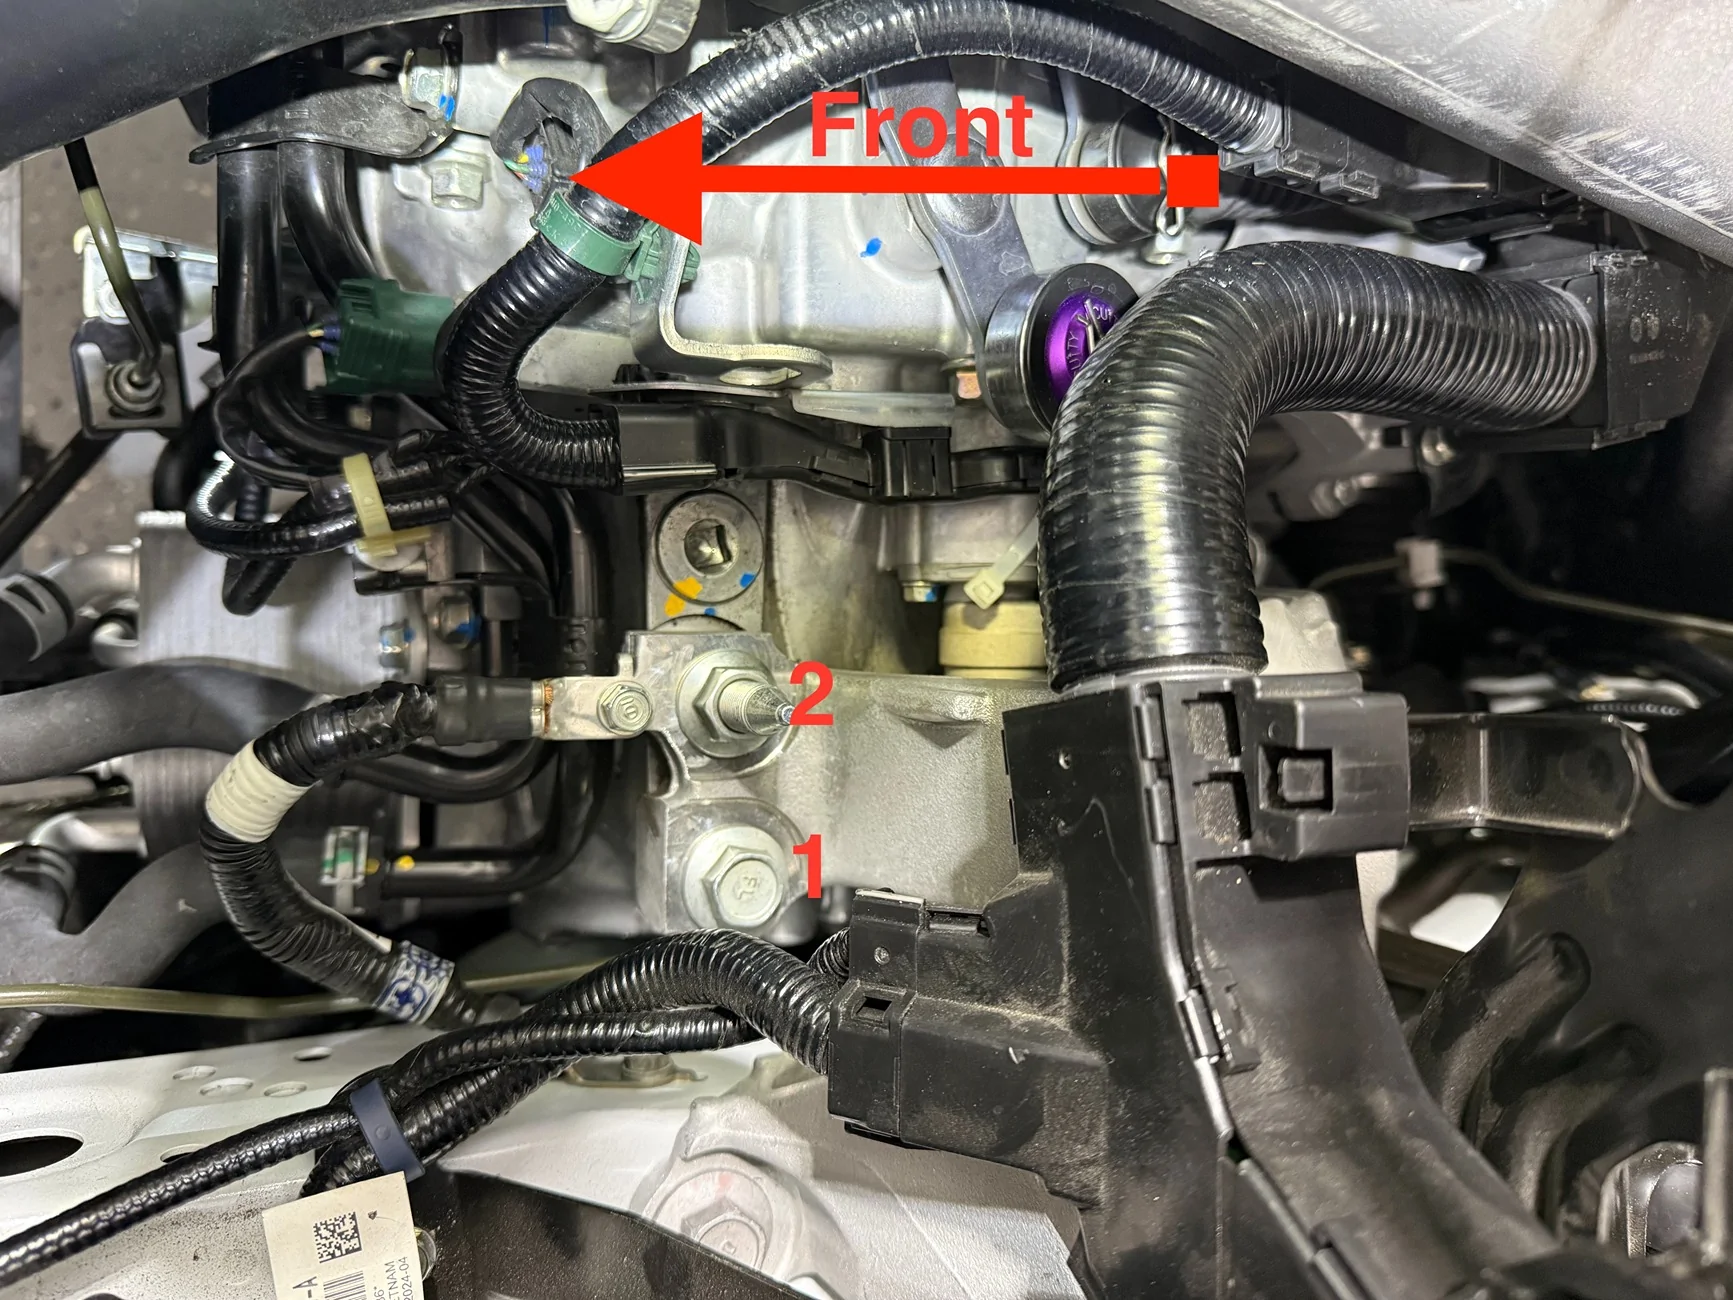
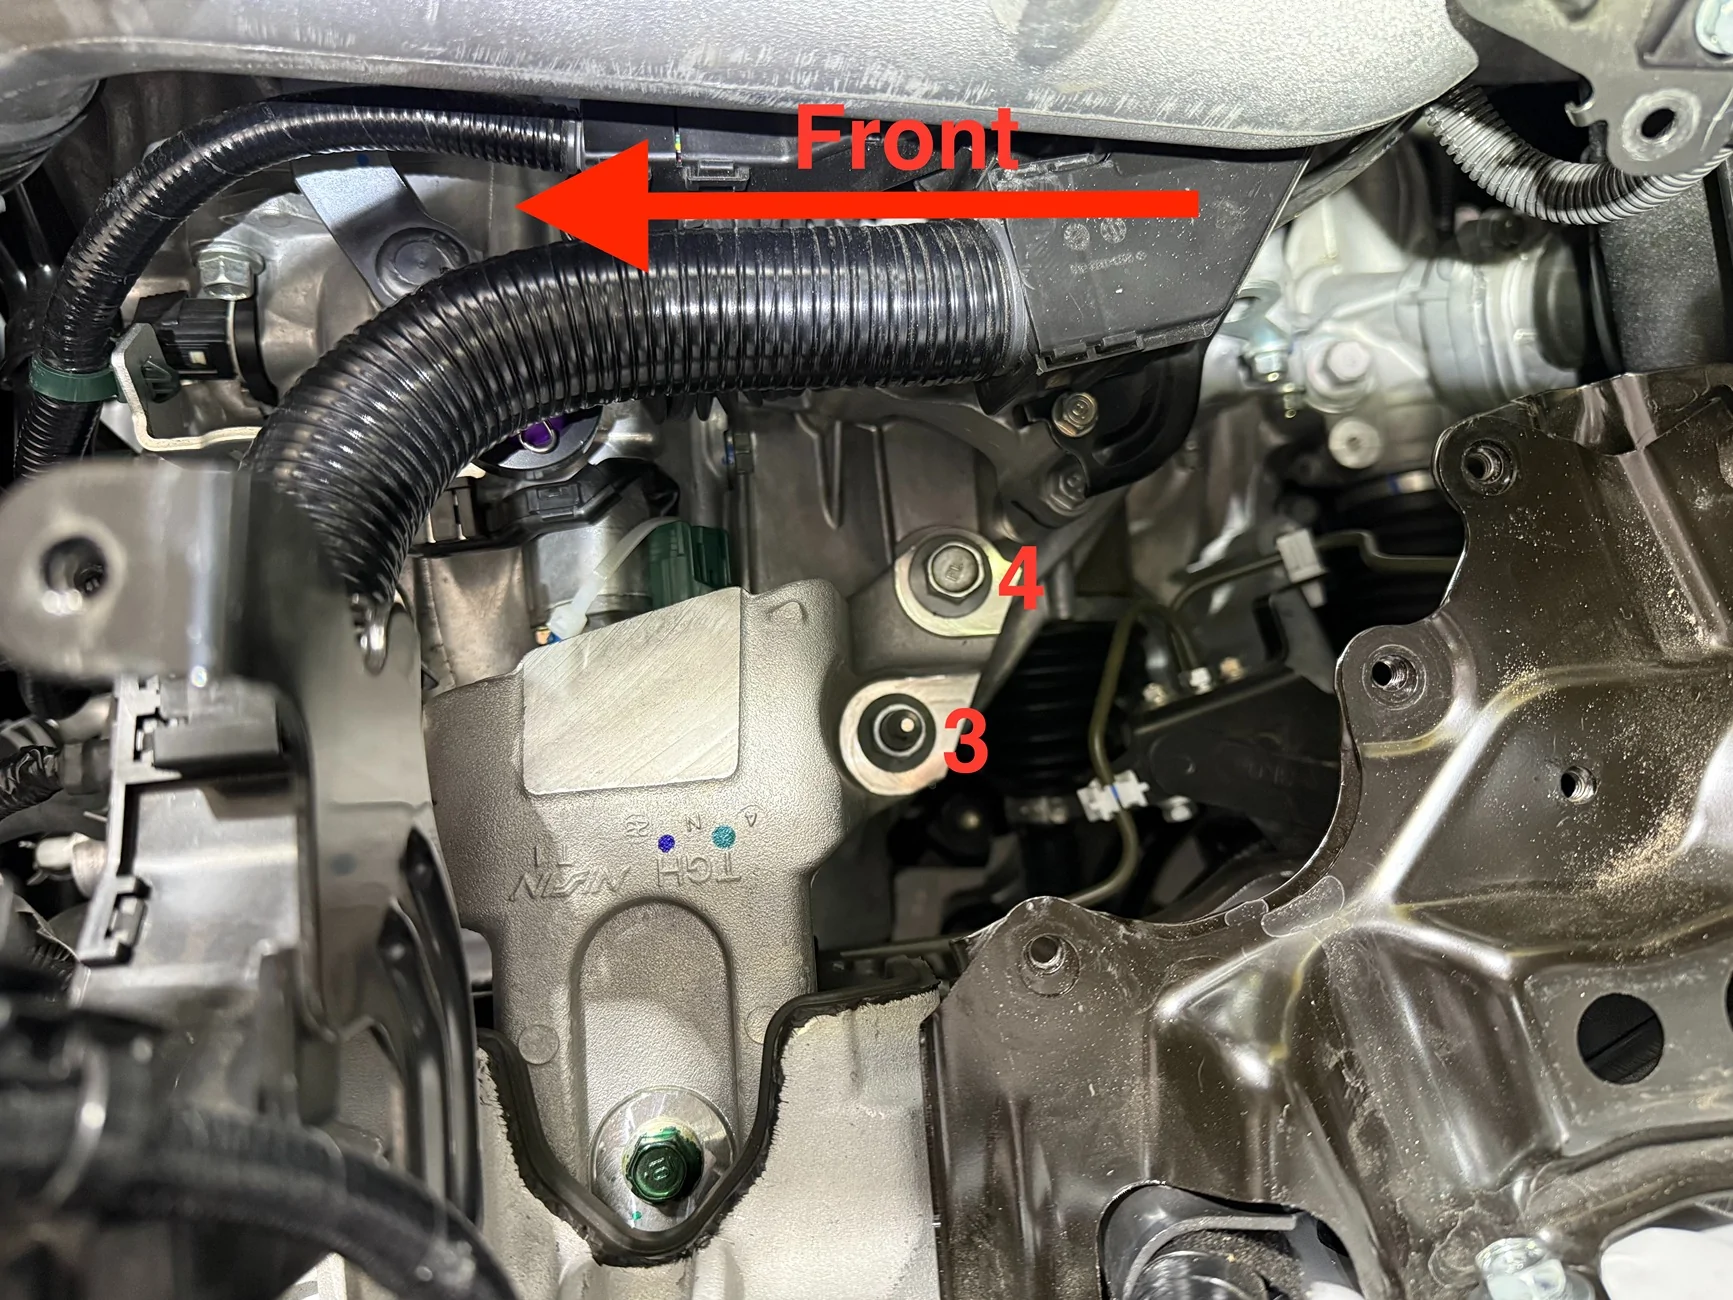
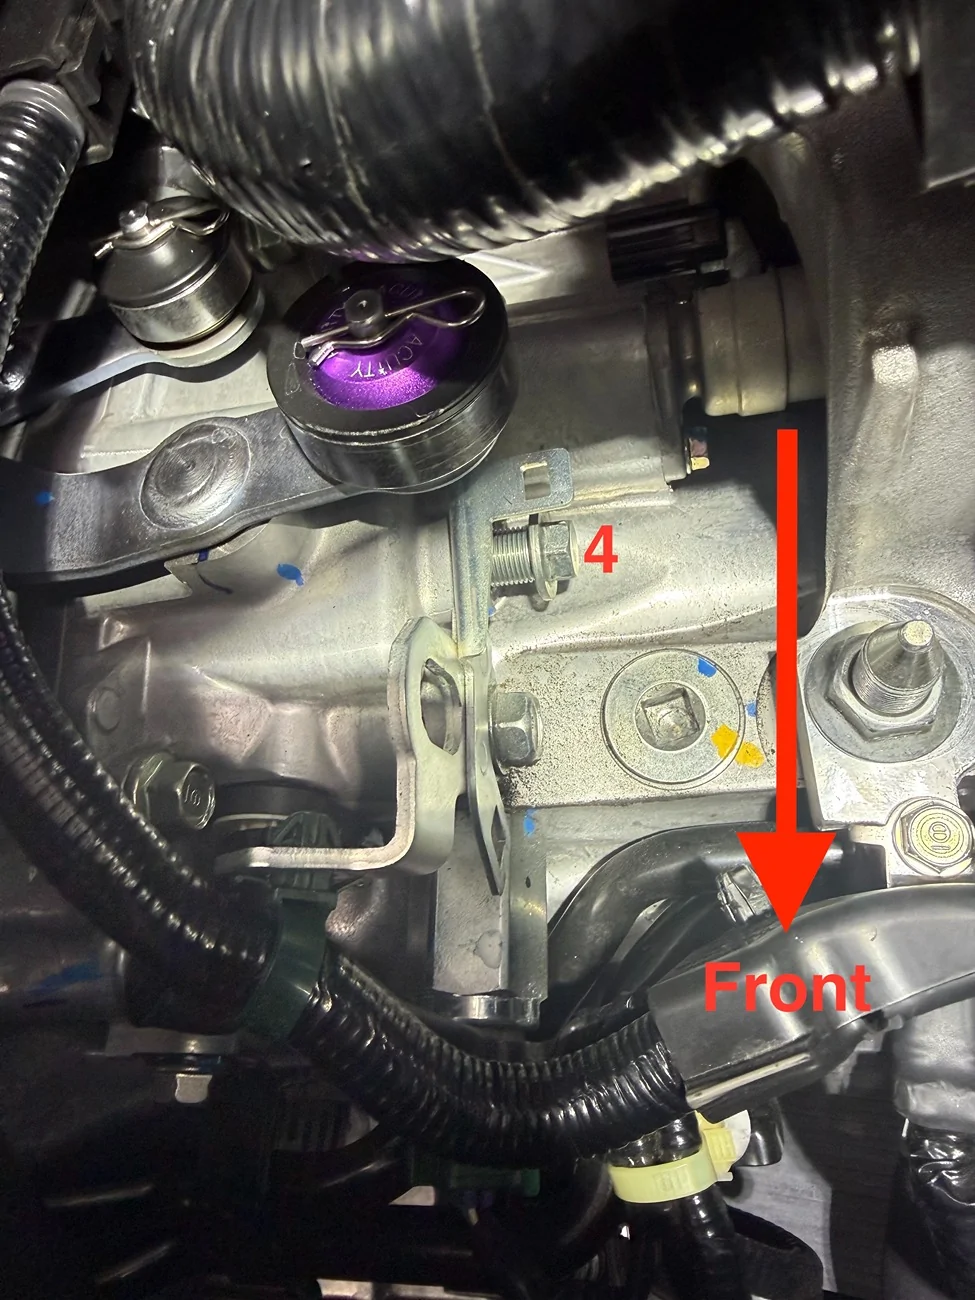
Remove these 4 bolts/nuts below (17mm), the green one (12mm), and 3 bolts on the upper mount (17mm) (forgot to take pictures on them). I also needed to remove the ECU and bracket to get access to the bolts. Removing the mounts IS THE MOST TEDIOUS AND CHALLENGING PART.
One challenges I ran into was to access the bolt towards the driver for the upper mount, there was a bundle of cable in the way and blocks access to that bolt. Later I found out the bottom of the cable enclosure was clipped into the chassis and the best way to unclip it is to use a flat head screw driver to pry it horizontall towards the passenger side (sorry I forgot to take pictures of this step).

After jiggling out the mount (2 pieces), the 3 detent spring bolts are revealed!
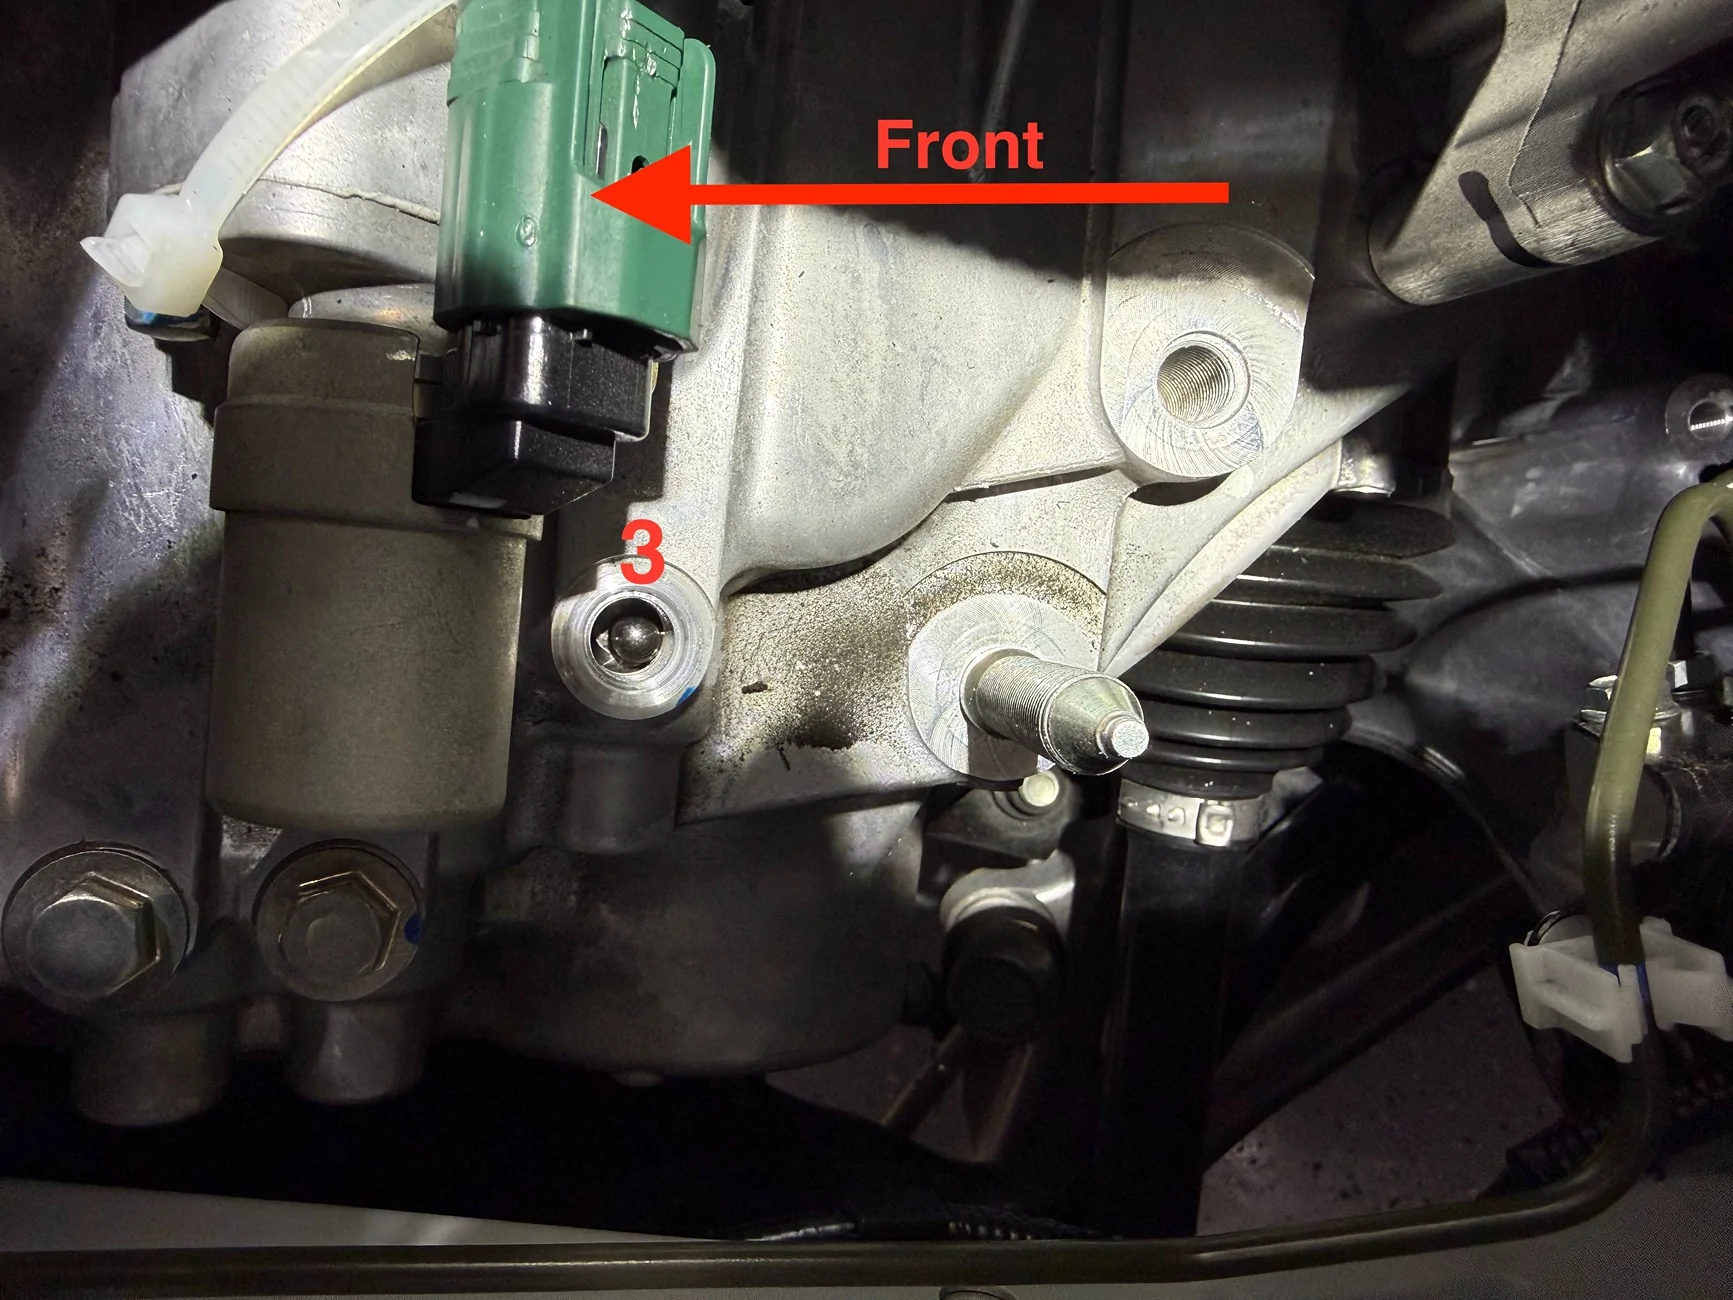
You can see the ball bearing after I remove the bolt #3:
After replace all 3 detent springs, reinstall the mount. Torque specs:
- 4 bolts connected to the transmission: 55 ft-lb
- 3 bolts connected to the chassis: 75 ft-lb
Here's a height comparison between OE (left) and FK8TD (right) detent spring:
And here's a quick, very "scientific" test of firmness of the 2 springs. I tried my best to apply equal pressure to each:
The FK8TD detent spring is about 2mm longer than OE spring, and about 15-20% firmer based on my very subjective test above.
The 4th Spring
This location of the 4th spring is the same with one of the springs advertised by Hybrid Racing detent spring instructions. I swapped the OE spring with FK8TD one, and did a quick shifting test. I'm glad I did test because I found it resulted a very mooshy 3-4 shift. Thus I undid it and restored the OE spring.
Final Thoughts
I didn't expect that much effort just to replace 3 small springs. I guess Honda really doesn't expect/want people to to tinker with it. If I were to start all over again, I would probably not bother with this mod given the very moderate improvement of shift feel.
Hope my experience helps scratch your itchiness about "notchiness"/"tactile feeling" and save you 3 hours of work (and your back, when jiggling out the transmission mount)
cc a few folks who might be interested in this: @ashmostro @Spart
This is my shifting setup prior to the detent springs.
https://www.integraforums.com/forum...rod-chasing-js-boot-delete.59455/#post-953410
+ Acuity 4-way adjustable shifter
+ Acuity SHIFTER CABLE BUSHING
(below are just cosmetic upgrades)
+ Acuity Titanium upper shift rod
+ Chasing JS Titanium shift boot delete (stock boot won't fit at the knob height I wanted)
+ Acuity ESCO-Ti Shift Knob in Burnt Titanium Finish
+ Acuity Shift Boot Collar Upgrade (Burnt Titanium Finish)
Hybrid Racing Detent Springs
- Installation Effort: moderate (1-1.5 hrs).
- Plenty of installation videos for FL5/DE5 on Youbute
- Num of springs: 2
- My Personal Verdict: NOT recommended
- makes shifting too stiff, especially the side-to-side movement.
- I often miss-shifted to 6th when I intended to reverse.
- makes daily driving/shifting tiring
I ended up uninstall them and restore to factory detent springs after a week.
FK8TD Detent Springs
- Installation Effort: hard (3-3.5hrs).
- Need to jack up the car, and remove driver side transmission mount
- Num of Springs: 4 (I only installed 3, more on this later)
- My Personal Verdict: if you're willing to spend 3 hours to improve your shifting feel by 20%, OR you plan to upgrade your transmission mount, GIVE IT A TRY
- slightly improved the notchiness when shifting into gear, by about 20% (very "scientific" I know)
- slightly increased front-back shifting effort (1-2, 3-4, 5-6)
- no effect on side-to-side resistance
These seems to be the less well-know detent spring, and there's not a lot videos/reviews about them.
I came across these springs from a blog post. It's for FK8, but the theory of operation makes a lot sense to me: there are 3 shifting rods (1-2, 3-4, 5-6) so we need 3 detent springs, one for each rod. (see the diagram below from that blog post). FL5/DE5, well, also has 3 shifting rods, and I don't expect Honda to dramatically change how the shifting internals between FK8 and FL5.
Even though I was mentally prepared by the blog post, the installation was still way more involved than I expected. Essentially you need to completely remove the driver side transmission mount in order to access the 3 detent springs.
Some helpful videos:
-
-
After removing the battery, battery tray and intake box, we need to uninstall the driver-side transmission mount. Here are some photos I took during the installation.
BEFORE remove these bolts, IT IS VERY IMPORTANT TO support the transmission from below, with a jack and wooden block. Jack it just tight enough until you feel slight resistance, don't apply too much pressure - we only want to support the transmission when we remove the mounting bolts.
Remove these 4 bolts/nuts below (17mm), the green one (12mm), and 3 bolts on the upper mount (17mm) (forgot to take pictures on them). I also needed to remove the ECU and bracket to get access to the bolts. Removing the mounts IS THE MOST TEDIOUS AND CHALLENGING PART.
One challenges I ran into was to access the bolt towards the driver for the upper mount, there was a bundle of cable in the way and blocks access to that bolt. Later I found out the bottom of the cable enclosure was clipped into the chassis and the best way to unclip it is to use a flat head screw driver to pry it horizontall towards the passenger side (sorry I forgot to take pictures of this step).
After jiggling out the mount (2 pieces), the 3 detent spring bolts are revealed!
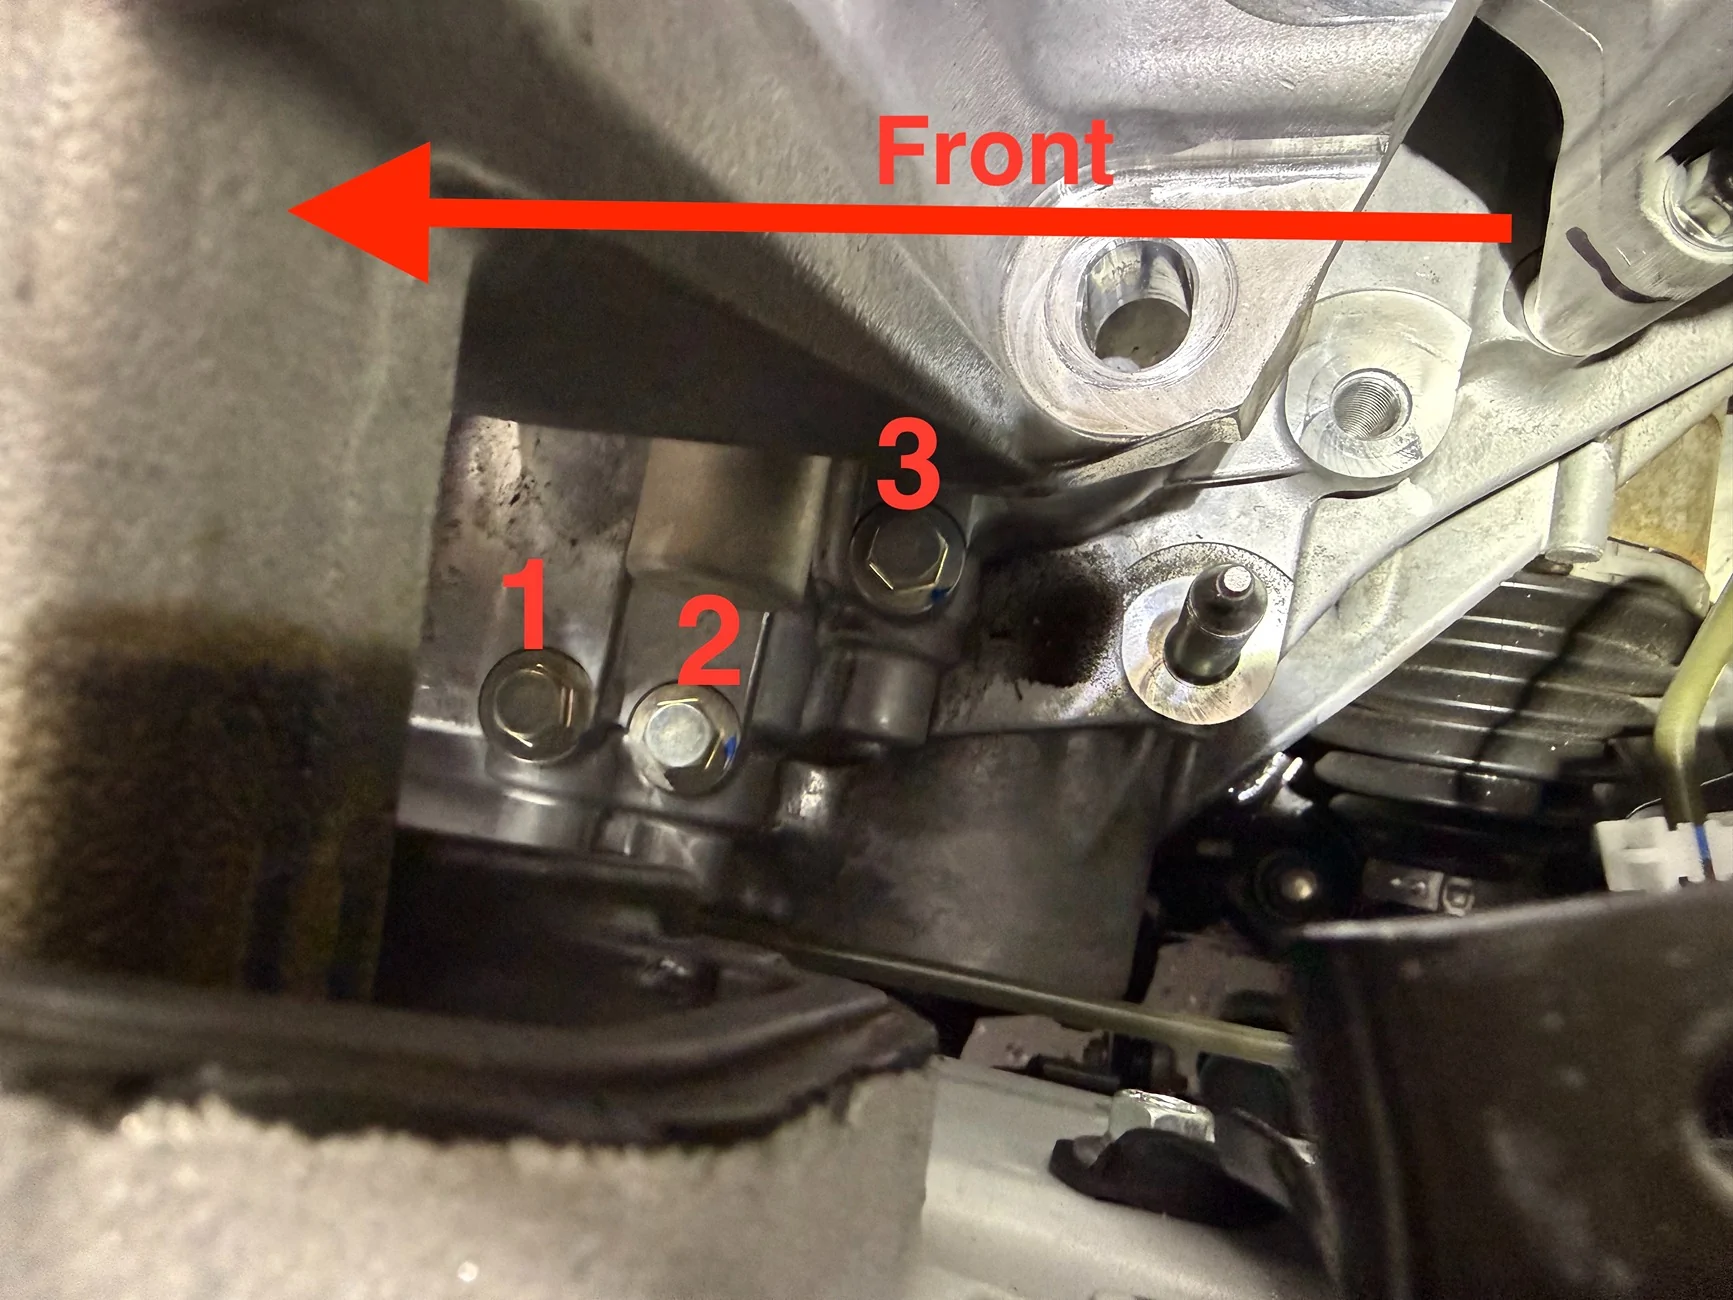
You can see the ball bearing after I remove the bolt #3:
After replace all 3 detent springs, reinstall the mount. Torque specs:
- 4 bolts connected to the transmission: 55 ft-lb
- 3 bolts connected to the chassis: 75 ft-lb
Here's a height comparison between OE (left) and FK8TD (right) detent spring:
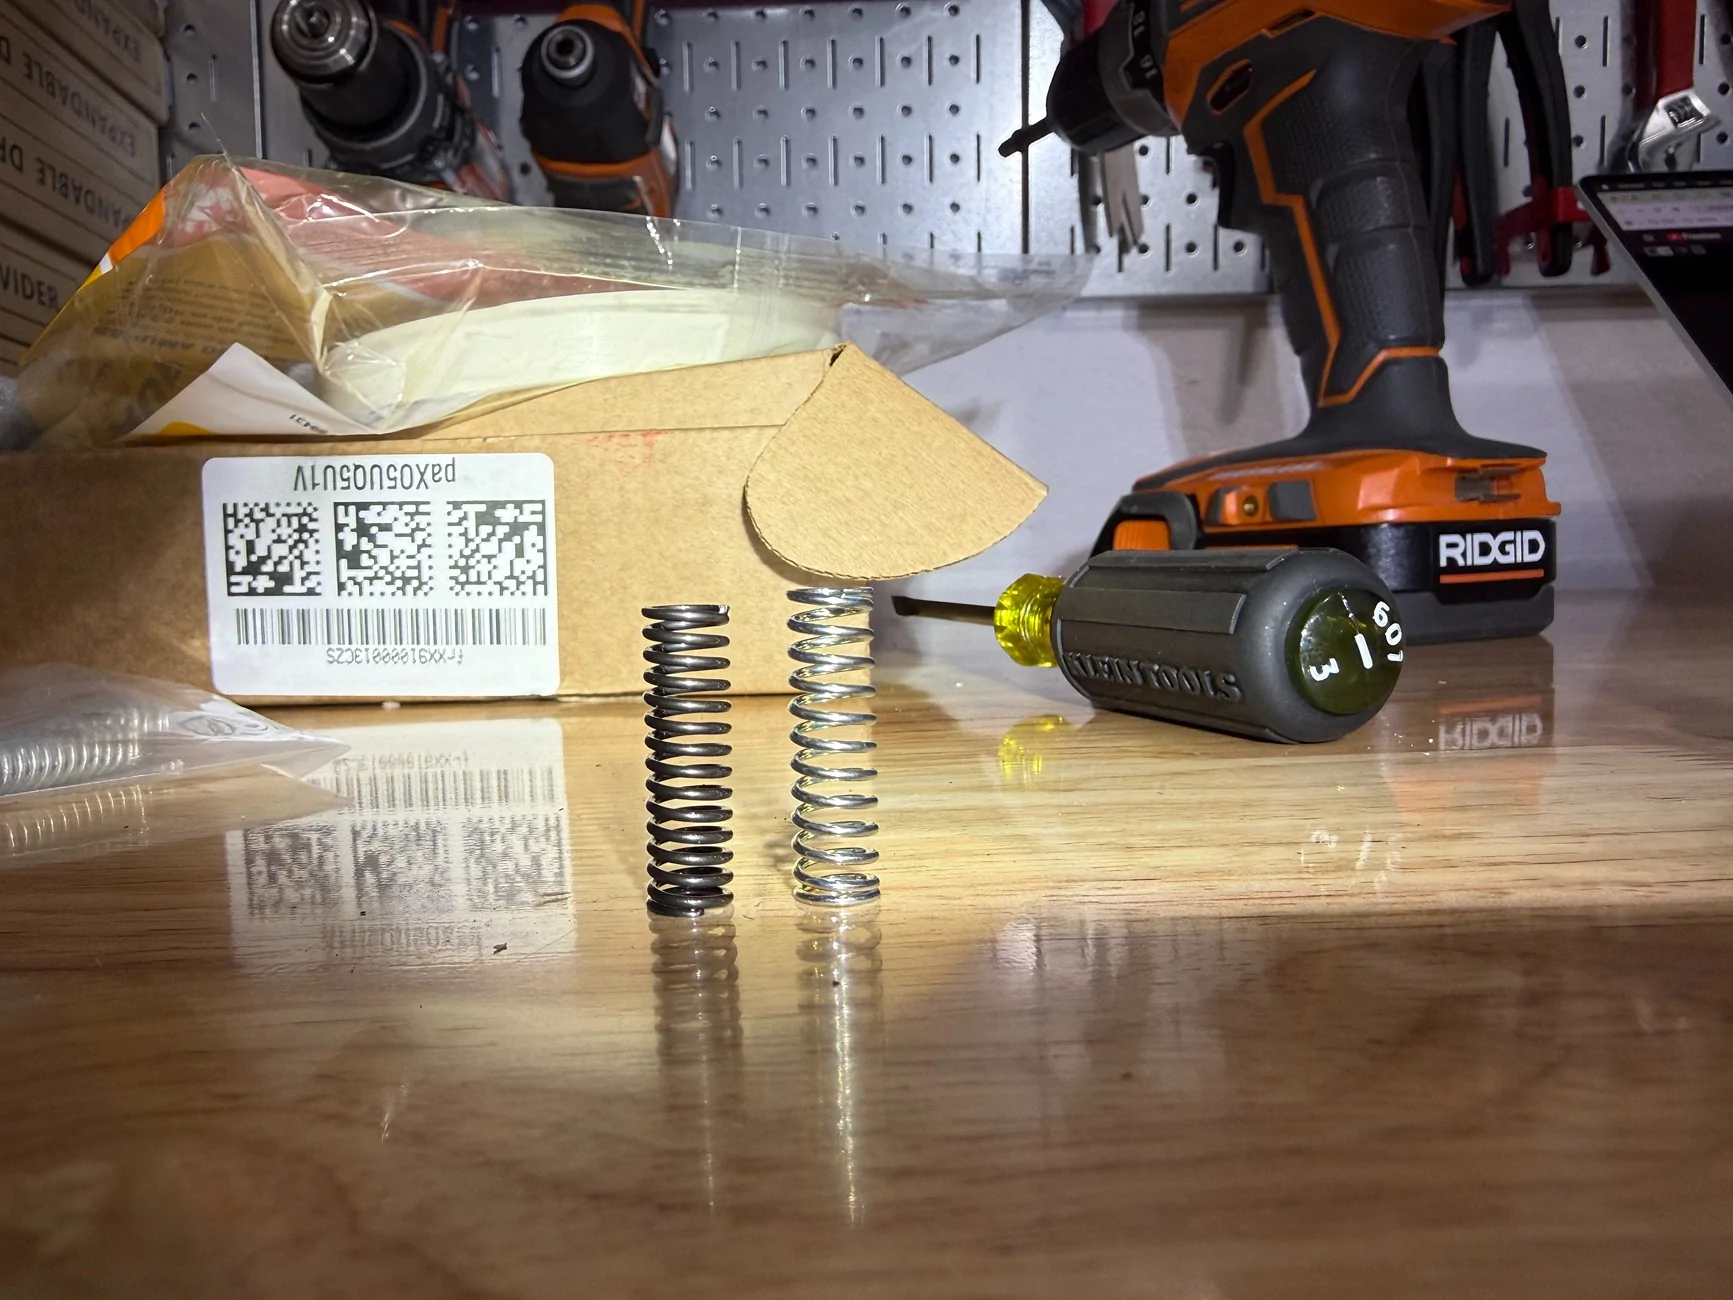
And here's a quick, very "scientific" test of firmness of the 2 springs. I tried my best to apply equal pressure to each:
The FK8TD detent spring is about 2mm longer than OE spring, and about 15-20% firmer based on my very subjective test above.
The 4th Spring
This location of the 4th spring is the same with one of the springs advertised by Hybrid Racing detent spring instructions. I swapped the OE spring with FK8TD one, and did a quick shifting test. I'm glad I did test because I found it resulted a very mooshy 3-4 shift. Thus I undid it and restored the OE spring.
Final Thoughts
I didn't expect that much effort just to replace 3 small springs. I guess Honda really doesn't expect/want people to to tinker with it. If I were to start all over again, I would probably not bother with this mod given the very moderate improvement of shift feel.
Hope my experience helps scratch your itchiness about "notchiness"/"tactile feeling" and save you 3 hours of work (and your back, when jiggling out the transmission mount)
cc a few folks who might be interested in this: @ashmostro @Spart
Sponsored
Last edited:
") See my other thread here:
See my other thread here: